Your first program
1. Introduction
BlocksDS is a collection of tools and libraries that allow you to develop applications for the Nintendo DS using C and C++. However, this tutorial doesn’t teach how to use any programming language. You will need to learn at least basic C by yourself if you don’t know it already.
If you aren’t familiar with the capabilities of the Nintendo DS, you should read Nintendo DS Architecture by Rodrigo Copetti first. It explains them without getting into a lot of detail, which is very useful to get a general idea of what you can do with the console.
Also, I recommend you to save the link to GBATEK in case you need low-level information about the hardware. It’s unlikely you will need that kind of information because the libraries abstract the hardware to make your life easier, but it can be good to know this hardware reference exists in case you need it.
2. Setting up the environment
The first thing we need to do is setup the development environment that we’re going to use. If you haven’t installed BlocksDS yet, follow the instructions here.
You will also need the examples of BlocksDS. I encourage you to edit the examples and experiment with them, so I advise you to get a copy of the examples that you can edit freely.
If you have git, you can clone the following repository:
git clone https://codeberg.org/blocksds/sdkIf you don’t have git or you don’t want to clone the repository you can also download it as a ZIP archive.
3. Getting a NDS emulator
Most of the time you will use emulators to test your applications and games while you develop them. The following three emulators are recommended.
- melonDS
melonDS is the most accurate out of the three, and under active development, and it’s available in all major OSes. It’s strongly encouraged that you use this emulator to test your games. It also supports debugging with GDB, which can be useful once you start to develop complicated programs. It has pretty good DSi mode support.
- no$gba
no$gba isn’t as accurate as melonDS, but it has an amazing integrated debugger. It’s only available on Windows, but it can be easily run on Linux with Wine. This integrated debugger can be more useful than GDB in some cases, so it’s definitely a great emulator to have in your arsenal. It has reasonable DSi mode support.
- DeSmuMe
DeSmuMe isn’t as accurate of no$gba or melonDS, but it’s very widespread and available in many platforms. I encourage you to test everything with DeSmuMe to maximize the number of people that can enjoy your creations. It doesn’t emulate DSi mode features.
4. Testing on hardware
Regardless of how many emulators you have, eventually you’ll need to test on hardware to ensure that everything works as expected. Depending on which model of NDS you own, there are two options:
- Slot-1 flashcarts
This option is the best option if you own a Nintendo DS or DS Lite. Slot-1 flashcarts are cartridges shaped like a regular NDS game that have a microSD slot where you can copy your NDS ROMs. There are many models, and there isn’t any specific model that can be recommended. All slot-1 flashcarts will work on any Nintendo DS or DS Lite consoles, but only some models will work on Nintendo DSi or 3DS consoles. My advice is to search information online to decide which one to buy.
If you own a DSi or 3DS, you should get a DSPico. Otherwise, you won’t be able to access DSi-only features. Other flashcards will only be able to load ROMs in DS backwards-compatibility mode.
- DSi custom firmware
If you have a Nintendo DSi or 3DS you can install a custom firmware that lets you run NDS ROMs stored in the SD slot of the console.
5. Building your first NDS program
Now that you have the toolchain installed, the examples downloaded, and some way to run your NDS ROMs, we are going to try to build a very simple demo to check that everything works.
If you are using Windows, remember that any command that we use to build NDS programs will need to be run from the “Wonderful Toolchain Shell”, which can be fount in the Start menu. If you’re using Linux, any terminal will work.
Regardless of how you have downloaded the code, open the shell and go to the
folder examples/console/custom_fonts.
From here, run the following command:
makeIf everything goes well, you should see something like this:
  GRIT    graphics/charmap_futuristic.png
  GRIT    graphics/anuvverbubbla_8x8.png
  GRIT    graphics/charmap_cellphone.png
  CC      source/main.c
  LD      build/console_custom_font.elf
  NDSTOOL console_custom_font.nds
Nintendo DS rom tool (BlocksDS v1.8.1-blocks)
by Rafael Vuijk, Dave Murphy, Alexei KarpenkoVERBOSE=1 make instead. It will print the full
commands that are being run by the build system.Load it in an emulator or in your console, you should get something like this:
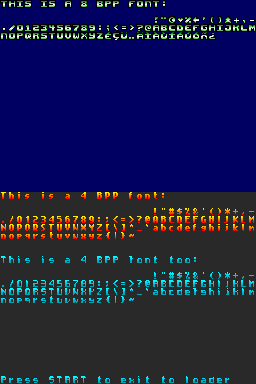
Congratulations! Now you can start learning how to create your own games and applications for the DS.
6. How to start your project
The recommended way to start your own project is to copy one of the templates or examples, delete the pre-existing code and assets, and start from there. The templates are small examples themselves, and they show how to add music, graphics and data to a simple demo.
There is a template that lets the programmer write the code for both CPUs of the
NDS (rom_combined) and a template that uses the default ARM7 core that comes
with Blocks DS and lets the programmer focus on the ARM9 core (rom_arm9).
There are also two templates to create static libraries. Similarly, most
examples only have ARM9 code, and some of them also have ARM7 code.
The main difference between the templates and the examples is that the templates include a full build system (the Makefile), but the examples have a minimal Makefile that depends on some reference Makefiles installed with BlocksDS. The templates give you full freedom to modify the build system, but you are also responsible for updating it when it changes in BlocksDS (very rarely). The build system of the examples gives you far less freedom, but you don’t need to worry about it because it gets upgraded when you upgrade BlocksDS. If you’re a beginner, it may be easier to start with an example than with a template.
Note that the makefiles have some strong limitations. They are good enough for small projects, but they don’t support some very useful features, like converting images and storing the result in the filesystem. You will need to do this kind of conversions yourself by hand. However, there’s an alternative build system called ArchitectDS that supports this kind of conversions, and it may be easier to use it than creating your own conversion scripts for a Makefile.
7. Understanding the default Makefiles
The default makefiles use the following variables to look for project files:
-
SOURCEDIRSis a list of folders that contain source code files. All subfolders are also included in the search by default. You can modify the search command. For example, you can set the depth of the search if you want:SOURCES_S += $(shell find -L $(SOURCEDIRS) -name "*.s") SOURCES_C += $(shell find -L $(SOURCEDIRS) -name "*.c" -mindepth 1 -maxdepth 2)Also, you can specify individual files instead. For example, this will look for all files in the
sourcefolder (including subfolders) and it will also build the filecommon/common.c:SOURCEDIRS := source SOURCES_C := common/common.c -
INCLUDEDIRSis a list of additional directories that the compiler will use as search paths when looking for headers. For example, if you have a folder calledincludeswith a file calledheader.h, and you have a file calledsource/main.c, you can do the following:INCLUDEDIRS := include#include "header.h" int main(void) { // ... } -
GFXDIRSis a list of folders that contain graphics. The default behaviour is to look for.pngfiles in all the folders (and subfolders). All.pngfiles with an associated.gritfile will be converted and added to the project. To learn how to use the converted data, check the 2D and 3D graphics chapters of the tutorial. -
BINDIRSis a list of directories that contain binary files that the developer wants to add to the ROM. The Makefile looks for all.binfiles in this list of folders, including subfolders. -
AUDIODIRSis a list of folders that contain audio data to be played back with Maxmod. All folders and subfolders are searched. The formats supported are.mod,.xm,.it,.s3mand.wav. Check the AUDIO CHAPTER TODO LINK -
NITROFSDIRis a list of directories that contain files that need to be added as to the filesystem of the ROM. All directories listed in this variable are combined into a single filesystem. Check the NitroFS chapter to see how to access the files from your code.
The templates that support both CPUs have multiple makefiles: one for each CPU,
and one to combine the result. In this case, NITROFSDIR is in the Makefile
that combines the output. The ARM9 makefile supports all other variables, and
the ARM7 only supports the variables related to source code files and data, but
not graphics or audio files.
Important note: The paths used in SOURCEDIRS, GFXDIRS and BINDIRS
must be inside the folder of the project. That means you can’t use .. in a
path to go one level up from the Makefile. If you really need to use folders
outside of the folder of the project, create a symlink to the destination, or
build the other code as a static library and link it with the project.
Finally, you can adjust the title and icon of a game by changing the following lines in the Makefile:
# Name of the resulting NDS file
NAME            := template_arm9

# Text that appears in the main menu of ROM loaders and the DS firmware
GAME_TITLE      := ARM9 only template
GAME_SUBTITLE   := Built with BlocksDS
GAME_AUTHOR     := blocksds.skylyrac.net

# Game icon (normally PNG or BMP). Animated GIF supported in DSi-compatible ROMs
GAME_ICON       := icon.gif
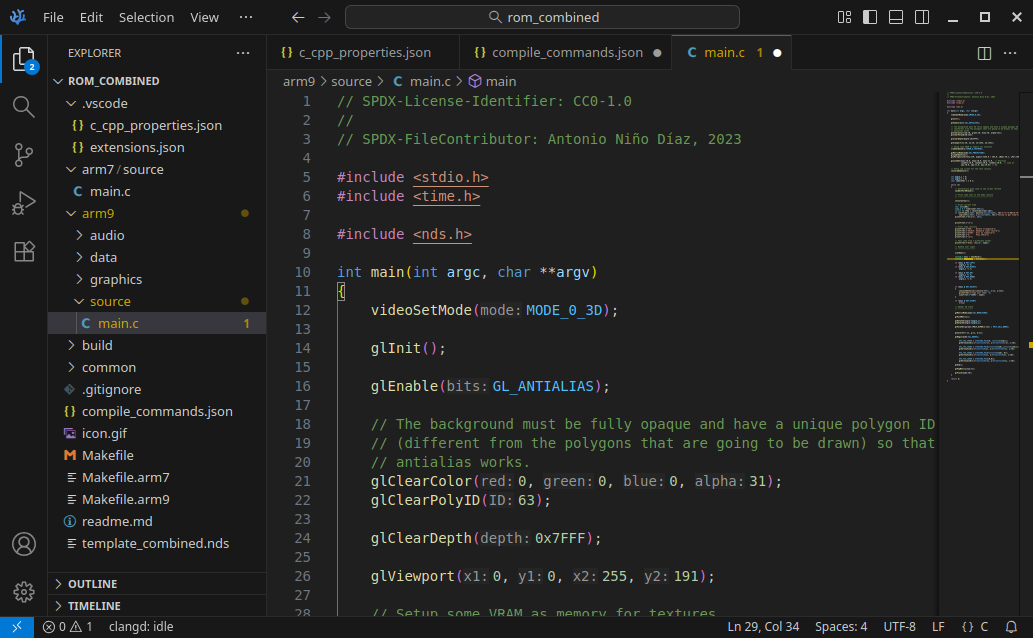
8. IDE integration with VSCode or VSCodium
BlocksDS provides reference configuration files for VSCode and VSCodium, you can
find them in sys/vscode.
If you want to use them, copy them to the folder of your project in a folder
called .vscode. This sets the compiler include paths and it recommends the
installation of the clangd extension.
Once you have the clangd extension you will need to enable the generation of
compile_commands.json files at build time. If you’re using the default
BlocksDS Makefiles you can set the variable COMPDB in your Makefile to 1.
Once you’re done, build your project with make, and open the folder in your
IDE. It will now be able to find the right system headers, which will make
autocompletion work.
9. Using additional libraries
This is slightly more advanced, but it’s here so that you’re aware of it. BlocksDS and Wonderful Toolchain provide several libraries that you can use in your own projects but aren’t available by default. The documentation of BlocksDS has information about each individual library, check this page. It mentions the specific commands you need to run to install each library in your system.
In general, you need to install a package with the library and add it to the Makefile so that your project can use it. You can get a list of available packages, including libraries, by running:
wf-pacman -SlFor example, you can install NFLib like this:
wf-pacman -Syu blocksds-nflibIf you want to use NFLib in your project, add it to the Makefile like this:
LIBS        += -lnflib -ldswifi9 -lnds9 -lc
LIBDIRS     += $(BLOCKSDSEXT)/nflib \
               $(BLOCKSDS)/libs/dswifi \
               $(BLOCKSDS)/libs/libnds
NFLib is a third-party library so it’s available in the BLOCKSDSEXT folder,
while the core libraries of BlocksDS are available at BLOCKSDS. All core
libraries are installed by default, and all of the third-party libraries need to
be installed manually.
Important note: Some ARM9 libraries have a corresponding ARM7 part. If you’re using an ARM9-only template, you need to select the right pre-built ARM7 binary. For example, if you use DSWiFi in the ARM9, make sure that you’re using an ARM7 binary with support for DSWiFi and Maxmod (the default one only supports Maxmod):
ARM7ELF := $(BLOCKSDS)/sys/arm7/main_core/arm7_dswifi_maxmod.elf
The list of supported ARM7 cores is here.