Backgrounds
1. Introduction
Backgrounds are just the images in the background of your game. For example, if you have a game in which your main character is walking through a forest, the main character is formed of sprites, and the forest is drawn with backgrounds.
The introduction of this chapter of Tonc may be interesting to read.
2. 2D video modes
Both graphics engines of the DS can display up to 4 backgrounds per screen. The video mode of an engine decides how many backgrounds are available on that engine and their type. This is the list of modes of the main engine and their meaning:
| Mode | Layer 0 | Layer 1 | Layer 2 | Layer 3 |
|---|---|---|---|---|
| 0 | Regular | Regular | Regular | Regular |
| 1 | Regular | Regular | Regular | Affine |
| 2 | Regular | Regular | Affine | Affine |
| 3 | Regular | Regular | Regular | Extended |
| 4 | Regular | Regular | Affine | Extended |
| 5 | Regular | Regular | Extended | Extended |
| 6 | - | - | Large | - |
-
Regular: Tiled backgrounds. Up to 1024 tiles in total. Tiles can be flipped vertically or horizontally. Each tile can use a different palette. Valid sizes: 256x256, 512x256, 256x512, 512x512 pixels. There are two color modes: one palette of 256 colors or 16 palettes of 16 colors each.
-
Affine: Tiled backgrounds that can be rotated and scaled. Limited to 256 tiles in total, and they can only use one 256-color palette. Tiles can’t be flipped or rotated. Valid sizes: 128x128, 256x256, 512x512 and 1024x1024 pixels.
-
Extended: This can be configured as a bitmap backgrounds (with a 256-color palette or direct-color) or an affine background. If set as an affine background, it can have up to 1024 tiles which can be flipped horizontally and vertically, and each tile can have a different palette.
Valid sizes:
- Extended affine: 128x128, 256x256, 512x512 and 1024x1024.
- 256-color bitmap: 128x128. 256x256, 512x256, 256x512, 512x512
- Direct-color bitmap: 128x128. 256x256, 512x256, 256x512 and 512x512.
-
Large: 256-color bitmap that can be rotated and scaled and use all 512 KB of the for main VRAM banks for the bitmap. Valid sizes: 1024x512 and 512x1024.
The only difference between the main and sub engines is that mode 6 isn’t available in the sub engine.
Note: There are some special modes in the main engine we haven’t discussed here. They are used for some special effects and they will be discussed in future chapters. Also, the 3D output replaces layer 0 regardless of the 2D video mode.
3. Displaying regular backgrounds
We’re finally going to see an example of displaying a regular background. You
can open examples/graphics_2d/bg_regular_8bit,
if you want to have a look at the code while reading this section. You can try
to build the example first, the output should be something like this (which you
can scroll with the D-Pad):
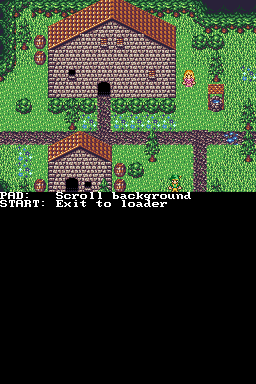
Now, let’s understand how the code works.
First, we need to check how to add an image to the project. The default build
system of BlocksDS uses grit to convert graphics from PNG into whichever DS
format you need. Images are placed in a folder in your project (in the example
it’s called graphics). The Makefile needs to be told to look for graphics in
that folder. You also need to add instructions for grit to know what to do: each
PNG file needs to have instructions on how to convert it. Remember that you
don’t need to call grit manually, the build system will do it for you.
In this case, we’re using a 256x256 regular PNG image. Be careful to not use more than 256 colors, or 255 if you want it to have transparent areas. If you want, you can use indexed-mode PNG files, but any PNG file will work.
The conversion instructions are saved in .grit files with the same name as the
PNG file. They are just text files with .grit extension. In this example, it
looks like this:
# 8 bpp, tiles, export map, SSB layout, set magenta as transparent color
-gB8 -gt -m -mLs -gTFF00FF
-gB8 tells grit to work in 8 bit per pixel mode. It will create one palette of
256 colors. -gt tells grit to create a tiled map. -m tells grit to also
export the tile map. The palette is exported by default (you can request it
explicitly with -p). -gTFF00FF tells grit to treat color FF00FF (magenta)
as transparent. If the image doesn’t have any magenta pixel, it will be fully
opaque.
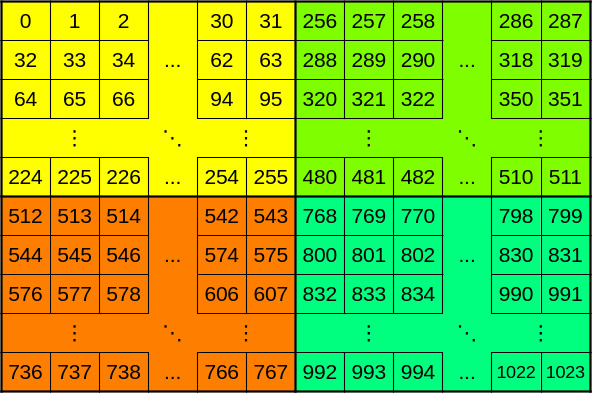
The last option, -mLs, arranges the tiles the right way. Regular backgrounds
are laid out in VRAM in blocks of 32x32 tiles. Inside each block tiles are
arranged from left to right, then top to bottom. The 32x32 blocks are also
arranged from left to right, then top to bottom. This is an example for a
512x512 pixels background (64x64 tiles):
In other sections we will see some situations in which we will use a regular
flat layout (-mLf).
Now that we’ve seen how to convert the image we need to see how to use the
converted graphics. Each pair of .png and .grit files create a .h file
that has to be included in the source code. In this case we have
forest_town.png and forest_town.grit, so forest_town.h is created
automatically.
Let’s go through the main code to get this working:
#include <nds.h>

// This file contains pointers to the data: `forest_townTiles`, `forest_townMap`
// and `forest_townPal`. It also contains the size of everything:
// `forest_townTilesLen`, etc.
#include "forest_town.h"

int main(int argc, char *argv[])
{
    // Use a video mode that sets layer 0 as a regular tiled background. Mode 0
    // sets all 4 layers as regular tiled backgrounds.
    videoSetMode(MODE_0_2D);

    // Designate VRAM A as memory for main engine backgrounds. This gives us 128
    // KB in total.
    vramSetBankA(VRAM_A_MAIN_BG);

    // Initialize layer 0 as a regular (text) background with 256 colors (8 bpp)
    // and size 512x256. The last 0 is the map base and the 1 is the tile base.
    // We'll talk about that in a minute.
    int bg = bgInitHidden(0, BgType_Text8bpp, BgSize_T_512x256, 0, 1);

    // Copy tiles and tile map to VRAM
    memcpy(bgGetGfxPtr(bg), forest_townTiles, forest_townTilesLen);
    memcpy(bgGetMapPtr(bg), forest_townMap, forest_townMapLen);

    // Copy palete to palette RAM
    memcpy(BG_PALETTE, forest_townPal, forest_townPalLen);

    // Display the background when all graphics are loaded
    bgShow(bg);

    // Wait forever
    while (1)
        swiWaitForVBlank();
}
bgInitHidden() sets up the background layer, but it doesn’t display it yet.
Normally you don’t want to display the background while the data is being copied
to VRAM. When the data is loaded, you can use bgShow() to display the
background. If you use bgInit() the layer will be displayed right away.
The example examples/graphics_2d/bg_regular_8bit also shows you how to scroll
the background with bgSetScroll(bg, x, y). The most important thing to
remember is that this function alone won’t update the background, it will simply
tell libnds to update the scroll to the right values the next time bgUpdate()
is called.
To finish this section let’s see how to create a background that uses 16
palettes of 16 colors instead. You can open
examples/graphics_2d/bg_regular_4bit,
There are only two differences you need to check. The first one is the grit file:
# 4 bpp, tiles, export map, ssb layout, not compressed, set magenta as transparent
-gt -gB4 -mR4 -mLs -gTFF00FF
And the second one is the way to setup the background (use BgType_Text4bpp
instead of BgType_Text8bpp):
int bg = bgInitHidden(0, BgType_Text4bpp, BgSize_T_256x256, 0, 1);4. Tile bases and map bases
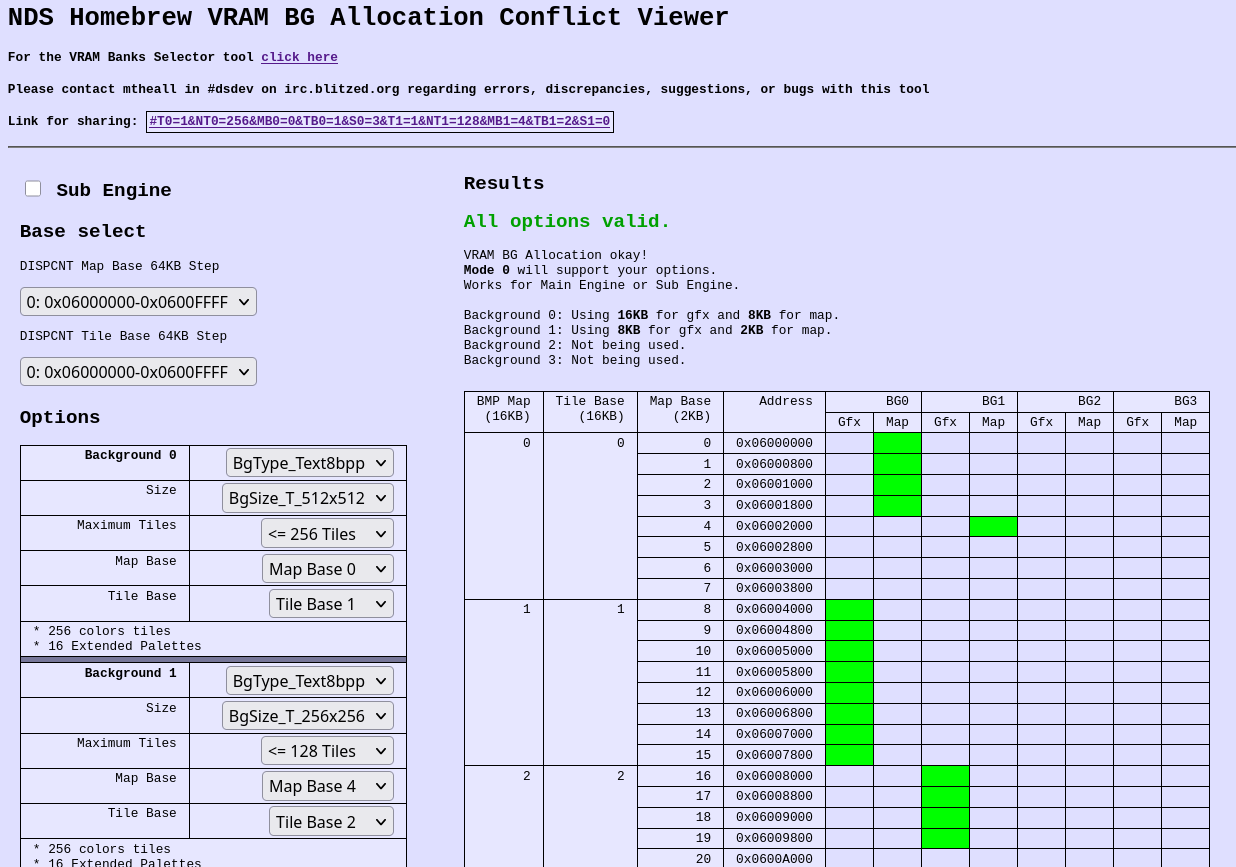
The purpose of palette VRAM is very clear: It contains palettes. However, the rest of VRAM isn’t so restrictive: You can copy tiles and maps wherever you want. You are free to organize how your data is saved in VRAM. However, that means you are in charge of it as well, so you need to learn how to work with this system.
Background VRAM is divided in tile slots (where you copy your tiles) and map slots (where you copy your maps). Tile slots are much bigger than map slots (8 map slots fit in one tile slot), and they overlap each other. Map slots 0 to 7 use the same physical memory as tile slot 0.
However, a map slot only has space for a 256x256 pixels map. The maximum size of a regular map is 512x512 pixels, which requires 4 map slots. The same thing happens with tiles. If you want to store the maximum number of tiles for a map (1024) you need 4 tile slots.
Bitmap backgrounds use the same system for map slots, but they don’t use tile slots (because they aren’t formed of tiles!).
This system lets you have multiple backgrounds on one screen with a lot of flexibility. If you have a very small background that uses very few tiles it will require just one map slot and one tile slot (you can even share the tile slot with another map). If you have a very big background with the maximum number of tiles you will need to assign more slots to it.
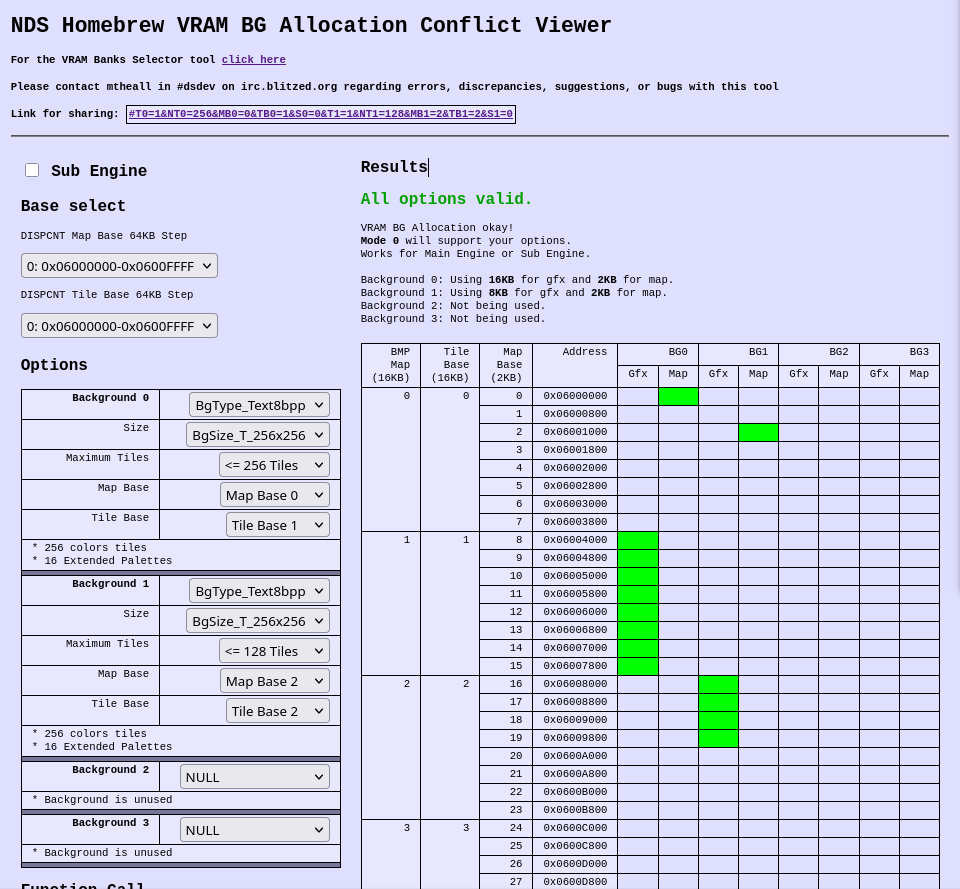
This whole system is very complicated and error-prone, so I recommend you to use this tool by mtheall and JustBurn:
Additionally, the main graphics engine supports adding a global fixed offset to all tile maps and tile set slots.
Normally, tile maps go from index 0 to 31 and they can be placed in addresses
0x06000000 to 0x0600FFFF (64 KiB). Tile sets go from index 0 to 15, and they
can be placed in addresses 0x06000000 to 0x0603FFFF (256 KiB). However,
background VRAM can go up to address 0x0607FFFF (512 KiB) in the main engine.
The global fixed offset lets you select the starting address used for tile set
or tile maps so that you can use any location in VRAM to store them. You will
only be able to use 64 KiB for tile maps and 256 KiB for tile sets, but you can
select where in VRAM they are located.
This is done by setting the base steps like this:
videoSetMode(MODE_0_2D | DISPLAY_CHAR_BASE(1) | DISPLAY_SCREEN_BASE(2));Each step adds an offset of 64 KiB to tile set or tile map slot bases. For example:
| Tile set step | Tile set base | Address |
|---|---|---|
| 0 | 0 | 0x6000000 |
| 0 | 2 | 0x6001000 |
| 1 | 0 | 0x6010000 |
| 1 | 2 | 0x6011000 |
This can be useful if you’re using the initial slots of background VRAM for bitmap backgrounds and you need to use the top addresses of background VRAM for tiled backgrounds.
Check examples/graphics_2d/bg_display_control_steps
to see a practical example that uses this feature.
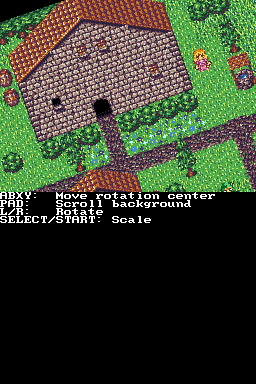
5. Displaying affine backgrounds
Affine backgrounds work almost the same as regular backgrounds, so you don’t need to learn anything new! The main difference is that they can be rotated and scaled.
Check examples/graphics_2d/bg_rotation
if you want to have a look at the code while reading this section. If you build
it you can rotate it, scale it and scroll it. It should look like this:
We need to convert the image in a different way:
# 8 bpp, tiles, export map, affine layout, set mangenta as transparent
-gB8 -gt -m -mLa -gTFF00FF
The difference is -mLa, which switches the background mode from regular format
to affine format.
Important: The maximum number of tiles supported by non-extended affine backgrounds is 256. This is a pretty strong limit and you will reach it before you realize. Remember to use extended backgrounds if you go over the limit, they are explained below.
In the code, the main two differences are the video mode and the way in which you initialize the background:
videoSetMode(MODE_2_2D);

int bg = bgInitHidden(2, BgType_Rotation, BgSize_R_256x256, 0, 1);
Video mode 2 sets layers 0 and 1 as regular backgrounds and layers 2 and 3 as affine backgrounds. Then, layer 2 is setup as an affine (rotation) background of dimensions 256x256 pixels. The code that loads the graphics is the same.
The main reason to use an affine background is to transform it. This is achieved by setting a center of transformations for the background, a rotation, a scale factor, and a scroll.
If you want more detail about how the transformation works, check this chapter of Tonc, and check this other chapter to see how it applies to affine backgrounds. In this tutorial we will focus on how to use libnds directly, so you don’t need to worry about the low-level details.
The center of rotation is defined with bgSetCenter(bg, center_x, center_y).
The values of center_x and center_y are fixed point values with a fraction
part of 8 bits. Normally, the background is rotated around (0, 0). If you want
it to rotate around a different point you will need to use this function.
If you want to rotate the background, use bgRotate(bg, angle). If you want to
scale it, use bgSetScale(bg, sx, sy). If you want to do both at the same time,
use bgSetRotateScale(bg, angle, sx, sy). Scale factors are fixed point values
with a fraction of 8 bits. Angles go from 0 to 32768: If you want to rotate the
image 180 degrees, use an angle of 16384. If you want to rotate the image 90
degrees, use an angle of 8192.
You can also scroll the background like regular backgrounds with
bgSetScroll(bg, x, y), but this function doesn’t have as much accuracy as
possible because it scrolls by whole pixels. If you scale a background you may
need finer scroll values than one pixel. In that case, use the function
bgSetScrollf(bg, x, y), which uses fixed point values with a fraction of 8
bits.
Finally, you can also decide if you want the background to wrap around or to be
transparent around its edges. You can use bgWrapOn(bg) and bgWrapOff(bg) to
enable wrapping or disable it.
6. Extended affine backgrounds
Extended affine backgrounds are just like affine backgrounds, but without the limitation of 256 tiles and the inability to flip tiles of affine backgrounds. It behaves like a regular background that can be rotated and scaled.
Check examples/graphics_2d/bg_ext_rotation.
There is no screenshot for this example because it’s the same one as for affine backgrounds.
The only things to consider is that:
-
It uses a flat layout instead of SSB layout. Use
-mLfin grit instead of-mLsin your grit file. -
The video mode and initialization of the background are slightly different:
videoSetMode(MODE_5_2D);

int bg = bgInitHidden(2, BgType_ExRotation, BgSize_ER_256x256, 0, 1);
Mode 5 sets layers 0 and 1 as regular backgrounds and layers 2 and 3 as extended backgrounds.
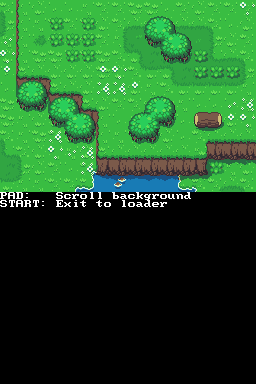
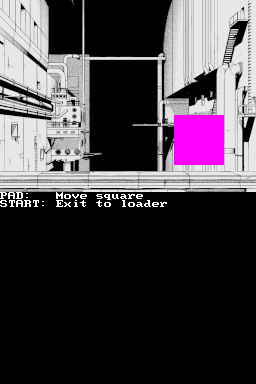
7. Displaying 256-color (8 bits per pixel) bitmaps
The good news is that the two previous modes were the hardest ones to understand! From this point, it’s easier.
Bitmap modes are ideal to display images that don’t follow any grid-like
pattern. Check examples/graphics_2d/bg_bmp_8bit:
The first important thing to mention are the instructions passed to grit:
# 8 bpp, bitmap, set magenta as transparent color, not compressed
-gB8 -gb -gTFF00FF
In this case, the -gt (generate tiled map) option isn’t used: -gb (generate
bitmap) is used instead. Another new option is -gTFF00FF, which tells grit to
leave palette index 0 as a transparent color and to treat magenta (colour
FF00FF) as a transparent color.
The code to load this is:
#include <nds.h>

#include "manga_bg.h"

int main(int argc, char *argv[])
{
    // With mode 5 layers 2 and 3 are extended background layers, which can be
    // setup as bitmap backgrounds.
    videoSetMode(MODE_5_2D);

    // The screen is 256x192 pixels. A 8-bit bitmap that size requires 48 KB
    // (256 x 192 / 1024). Each VRAM bank is 128 KB, so we can store two bitmaps
    // in a single VRAM bank.
    vramSetBankA(VRAM_A_MAIN_BG);

    // Setup layer 2 as an 8-bit bitmap background with size 256x256
    int bg = bgInitHidden(2, BgType_Bmp8, BgSize_B8_256x256, 0, 0);

    // Load the palette and the bitmap
    memcpy(BG_PALETTE, manga_bgPal, manga_bgPalLen);
    memcpy(bgGetGfxPtr(bg), manga_bgBitmap, manga_bgBitmapLen);

    // Display the background when all graphics are loaded
    bgShow(bg);

    // Wait forever
    while (1)
        swiWaitForVBlank();
}
There isn’t much more to it. You load the background, the palette, and that’s it.
One of the advantages of bitmap modes is that they are easy to edit by hand.
However, instead of editing the current image being displayed, you should use a
double buffer setup. The code in examples/graphics_2d/bg_bmp_8bit shows you
how to use two buffers in such a way that you can draw on the background without
any tearing or video synchronization issues (note that bgSetMapBase() doesn’t
need bgUpdate() to update the map base):
    uint16_t *backbuffer = bgGetGfxPtr(bg);

    // Bitmap base 0 is at offset 0 (start of VRAM A) and bitmap base 8 is
    // at offset 64 KB (4 * 128 * 128 B) (middle of VRAM A).
    if (bgGetMapBase(bg) == 4)
        bgSetMapBase(bg, 0);
    else
        bgSetMapBase(bg, 4);

    // Now you can edit the data in `backbuffer`, which will be displayed in the
    // next frame.
One last thing: You can rotate and scale bitmap backgrounds as well! Do it the
same way as with affine backgrounds, and don’t forget calling bgUpdate().
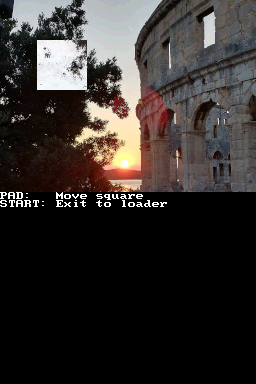
8. Displaying direct-color (16 bits per pixel) bitmaps
This kind of bitmaps allow you to display any image you want without restrictions, and it’s the easiest to setup! However, it’s also the slowest one to deal with, and the one that uses the most VRAM, so it’s not very well-suited for regular games. It’s ideal for photos, for example.
Check examples/graphics_2d/bg_bmp_16bit:
This is how you convert graphics for this format:
# 16 bpp, bitmap, set alpha bit to 1, not compressed
-gB16 -gb -gT!
-gB16 sets the bit depth to 16 bits, -gb generates a bitmap, and -gT!
removes all transparency from the final image (you can use -gTFFOOFF or
similar arguments if you want some pixels to be transparent!).
#include <nds.h>

#include "photo.h"

int main(int argc, char *argv[])
{
    videoSetMode(MODE_5_2D);

    // The screen is 256x192 pixels. A 16-bit bitmap that size requires 96 KB
    // (256 x 192 x 2 / 1024). Each VRAM bank is 128 KB, so we need one full
    // bank to display this background.
    vramSetBankA(VRAM_A_MAIN_BG);

    // Setup layer 2 as a 16-bit bitmap
    int bg = bgInitHidden(2, BgType_Bmp16, BgSize_B16_256x256, 0, 0);

    // Load bitmap
    memcpy(bgGetGfxPtr(bg), photoBitmap, photoBitmapLen);

    // Display the background when all graphics are loaded
    bgShow(bg);

    while (1)
        swiWaitForVBlank();
}
That’s it. No palettes, no tiles… you just copy the bitmap, and it’s done.
It’s also interesting to mention that this mode is great if you want to be able to modify the image without any restriction. 8-bit bitmaps can be a bit annoying because you are restricted to the colors in the 256-color palette. With a 16-bit bitmap you can draw without any limitation.
If you want to setup a double buffering system you will need to use two VRAM
banks, though. Check examples/graphics_2d/bg_bmp_16bit for more details. The
idea is the same as with 8-bit double buffering setups, but reserving more space
for each buffer.
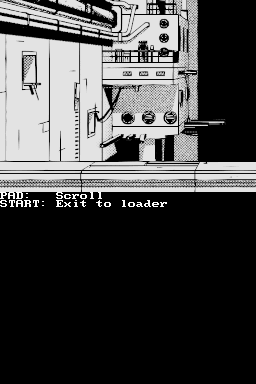
9. Displaying large 256-color bitmap backgrounds
This mode is just a larger 256-color bitmap backgrounds than the ones explained before. Note that only the main engine can be set in this mode.
Check examples/graphics_2d/bg_bmp_8bit_large:
The instructions passed to grit are the same as with regular 8-bit backgrounds:
# 8 bpp, bitmap, set magenta as transparent color, not compressed
-gB8 -gb -gTFF00FF
The code to load this is a bit different:
#include <nds.h>

#include "manga_bg.h"

int main(int argc, char *argv[])
{
    // With mode 6 only layer 2 is available, and it's a large 256-color bitmap
    videoSetMode(MODE_6_2D);

    // Video mode 6 is designed to display a large bitmap stored in all primary
    // VRAM banks: 128 KB * 4 = 512 KB in total.
    vramSetPrimaryBanks(VRAM_A_MAIN_BG_0x06000000,
                        VRAM_B_MAIN_BG_0x06020000,
                        VRAM_C_MAIN_BG_0x06040000,
                        VRAM_D_MAIN_BG_0x06060000);

    // Valid sizes are 1024x512 and 512x1024
    int bg = bgInitHidden(2, BgType_Bmp8, BgSize_B8_1024x512, 0, 0);

    // Load the palette and the bitmap
    memcpy(BG_PALETTE, manga_bgPal, manga_bgPalLen);
    memcpy(bgGetGfxPtr(bg), manga_bgBitmap, manga_bgBitmapLen);

    // Display the background when all graphics are loaded
    bgShow(bg);

    // Wait forever
    while (1)
        swiWaitForVBlank();
}
You can rotate it, scale it and scroll it (remember to call bgUpdate()
afterwards).
One trick that you can use is that, if you don’t need the full size of the
bitmap, you can use VRAM banks for other things, and it will work. For example,
if you want a 1024x256 background you can assign VRAM A and B as main engine
background RAM, tell bgInitHidden() that you want a 1024x512 bitmap, and the
2D engine will only be able to use those banks for the bitmap. You’ll be free to
use VRAM C and D for other things.
10. Background priorities
The last thing to mention in this super long chapter is that you can change the
priorities of all background layers on the screen. The table with the video
modes may give you the impression that the order in the table is the order of
priorities of the layers, but you can change it by calling
bgSetPriority(bg, priority) for each layer.
The highest priority is priority 0, which is displayed on top of priorities 1, 2 and 3. If two layers have the same priority, the one with the lowest index is displayed on top.
11. Using the sub engine
Excluding the large background mode, which isn’t available in the sub engine, everything else works exactly the same. All you need to do is repeat the setup you’ve done for the main engine.
Check this example for a practical demonstration:
examples/graphics_2d/bg_regular_8bit_2screens
For example, if we remember how we loaded tiled backgrounds before, this is how you would display the same background in both screens:
#include <nds.h>

// This file contains pointers to the data: `forest_townTiles`, `forest_townMap`
// and `forest_townPal`. It also contains the size of everything:
// `forest_townTilesLen`, etc.
#include "forest_town.h"

int main(int argc, char *argv[])
{
    // Use a video mode that sets layer 0 as a regular tiled background. Mode 0
    // sets all 4 layers as regular tiled backgrounds.
    videoSetMode(MODE_0_2D);
    videoSetModeSub(MODE_0_2D); // New!

    // Designate VRAM A as memory for main engine backgrounds. This gives us 128
    // KB in total. Designate VRAM C for sub engine backgrounds.
    vramSetBankA(VRAM_A_MAIN_BG);
    vramSetBankC(VRAM_C_SUB_BG); // New

    // Initialize layer 0 as a regular (text) background with 256 colors (8 bpp)
    // and size 256x256. The last 0 is the map base and the 1 is the tile base.
    // We'll talk about that in a minute.
    int bg = bgInitHidden(0, BgType_Text8bpp, BgSize_T_256x256, 0, 1);
    int bgsub = bgInitHiddenSub(0, BgType_Text8bpp, BgSize_T_256x256, 0, 1); // New

    // Copy tiles and tile map to VRAM (main engine)
    memcpy(bgGetGfxPtr(bg), forest_townTiles, forest_townTilesLen);
    memcpy(bgGetMapPtr(bg), forest_townMap, forest_townMapLen);

    // Copy tiles and tile map to VRAM (sub engine)
    memcpy(bgGetGfxPtr(bgsub), forest_townTiles, forest_townTilesLen); // New
    memcpy(bgGetMapPtr(bgsub), forest_townMap, forest_townMapLen); // New

    // Copy palete to palette RAM
    memcpy(BG_PALETTE, forest_townPal, forest_townPalLen);
    memcpy(BG_PALETTE_SUB, forest_townPal, forest_townPalLen); // New

    // Display the backgrounds when all graphics are loaded
    bgShow(bg);
    bgShow(bgsub);

    // Wait forever
    while (1)
        swiWaitForVBlank();
}
12. Multiple layers
Until now we have used only one background layer using different configurations. However, normally, you will want to use more than one layer. Unfortunately, this means that it’s more difficult to load tiles and maps to VRAM.
If you want to display two backgrounds on the same screen you will need to define slots of tile sets and tile maps that don’t overlap. For example, suppose you want to display two 256-color backgrounds, one with 256 tiles and another one with 128 tiles. One possible setup would be:
The resulting code would be:
videoSetMode(MODE_0_2D);

bgInitHidden(0, BgType_Text8bpp, BgSize_T_512x512, 0, 1);
bgInitHidden(1, BgType_Text8bpp, BgSize_T_256x256, 4, 2);
You can experiment with it here:
https://mtheall.com/vram.html#T0=1&NT0=256&MB0=0&TB0=1&S0=3&T1=1&NT1=128&MB1=4&TB1=2&S1=0
It’s possible to use multiple layers sharing tile sets or tile maps. Sharing tile sets is very common and it allows you to save a lot of space in the final ROM in a very convenient way. Sharing tile maps doesn’t make sense in general.
Sharing palettes is mandatory, though. There is only one 256-color palette. You can split it into 16 palettes of 16 colors each, and you can be clever about how you share palettes in both modes, but this is inconvenient.
The current Makefiles of BlocksDS don’t allow you to convert PNG files and share
tile sets or palettes. You can do it if you run the tool manually. Check
options -S and -pS from the documentation of grit if you’re curious about
it. The command line interface of grit for shared graphics is a bit restrictive.
If you can’t get used to it and want an alternative, check this out:
SuperFamiconv
This tool is provided in the Wonderful Toolchain packages:
wf-pacman -Sy wonderful-superfamiconvBecause of the limitations of grit we’re going to skip any real code example in this section. Instead, wait for the section about extended palettes. They will allow us to have background layers that don’t need to share palettes.
13. Backdrop color
This is a small detail, but it can be unexpected.
When you display a background, color index 0 is always transparent. That means that in 256-color backgrounds you have 255 available colors, and in 16x16 color backgrounds you only have 15x16 available colors.
The color that is displayed under the background is the backdrop color. It’s the color that gets displayed if there are no sprites or backgrounds covering some part of the screen.
The backdrop color is index 0 of the background palette, and you can set it with the following functions:
setBackdropColor(RGB15(31, 0, 0));
setBackdropColorSub(RGB15(31, 31, 0));
This code will set the backdrop color of the main graphics engine to red, and the one of the sub engine to green.
It’s very easy to convert backgrounds and to forget to specify a transparent color. Normally, this means that grit will use color index 0 as a normal color to be used by your background. Initially, if you only have one background layer, you won’t notice anything. However, when you add more layers, it will become more obvious.
My advice is to always set a transparent color when using grit to convert
graphics. Using -gTFF00FF is a good idea because that shade of magenta is
barely used.
The only exception is 16-bit backgrounds. They don’t use the background palette
memory, so you can use gT! or not depending on whether you want it to have
some transparent pixels or not.
14. Extended palettes
If you want to display multiple 2D background layers, the limitation of having one single palette is very restrictive. Extended palettes allow you to have up to 16 palettes for each background layer!
A very simple way to use extended palettes is to use one full 256-color palette for each background layer. You could also use 16x256 palettes in one single layer, in a similar way as the 16x16 color palette mode.
This section will talk about the first situation because it’s the one that is most likely to be used. It will load two different images with two different 256-color palettes.

The code of this example is here: examples/graphics_2d/bg_ext_palette.
The process to load extended palettes is a bit more difficult than loading regular palettes, but not by much. In short: You can’t make the background palette memory bigger, so you need to take one of the VRAM banks that can work as extended palette memory and assign it as extended background palettes. The main 2D engine can use VRAM banks E, F and G. The sub 2D engine can only use VRAM bank H for background extended palettes.
However, you can’t copy data to the banks at any point. Once you set them up as extended background palettes you can’t access them from the CPU. The correct process is to set them to LCD mode, copy the data, and set them to extended palette mode:
// Let the CPU access VRAM E and H to copy the extended palettes. Extended
// palette VRAM can't be accessed by the CPU (background VRAM can be
// accessed even without mapping it as LCD).
vramSetBankE(VRAM_E_LCD);
vramSetBankH(VRAM_H_LCD);

// Main engine background palettes

// Background layer 0, palette 12
memcpy(&VRAM_E_EXT_PALETTE[0][12], ponypoke_0Pal, ponypoke_0PalLen);
// Background layer 1, palette 7
memcpy(&VRAM_E_EXT_PALETTE[1][7], forest_townPal, forest_townPalLen);

// Sub engine background palettes

// Background layer 1, palette 12
memcpy(&VRAM_H_EXT_PALETTE[1][12], ponypoke_0Pal, ponypoke_0PalLen);
// Background layer 2, palette 7
memcpy(&VRAM_H_EXT_PALETTE[2][7], forest_townPal, forest_townPalLen);

// Setup VRAM as extended palette VRAM

vramSetBankE(VRAM_E_BG_EXT_PALETTE);
vramSetBankH(VRAM_H_SUB_BG_EXT_PALETTE);
Tile sets and tile maps don’t need anything special. Copy them the same way as before.
Make sure to actually enable background extended palettes:
bgExtPaletteEnable();
bgExtPaletteEnableSub();
Also, you will need to convert your graphics in a special way. You will need to tell grit the palette index to be used by the background:
forest_town.grit
# 8 bpp, tiles, export map, palette 7, SSB layout, not compressed
-gB8 -gt -m -mp7 -mLs -gTFF00FF
ponypoke_0.grit
# 8 bpp, tiles, export map, palette 12, SSB layout, not compressed
-gB8 -gt -m -mp12 -mLs -gTFF00FF
And that’s it! As you can see, it requires a bit of additional setup, but it’s a very simple way to make your 2D graphics look a lot better.
15. Meta maps
Meta maps are a way to compress tile maps in your ROM. The Nintendo DS only supports 8x8 pixel tiles, but there are situations in which you don’t need that much detail. For example, in the Pokémon games for Game Boy and Game Boy Advance, the size of the characters is 16x16 pixels, and the map is also designed using 16x16 pixel tiles.
In this screenshot, each pink square contains a 16x16 meta tile composed of four 8x8 tiles.
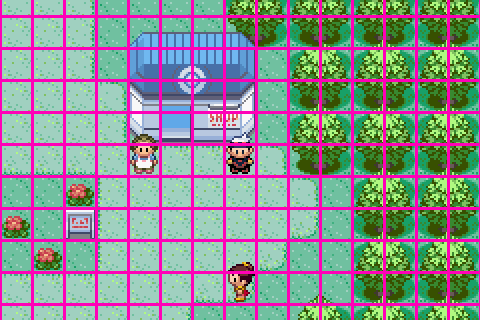
If you look carefully you can see the meta tiles that form the trees, the grass, even the signpost, etc. Some elements, like the buildings, are more complicated and they are composed by meta tiles that aren’t repeated often. Some elements, like the grass, are reused all the time.
In some cases, elements are placed in different background layers completely. For example, the roof of the buildings is usually placed in a different layer than the walls so that characters can be on top of the walls of the building, but under the roof. This also means that you need fewer combinations of metatiles: if your meta tiles are transparent in the parts not covered by the building, you can place them on top of any background (grass, dirt, water…).
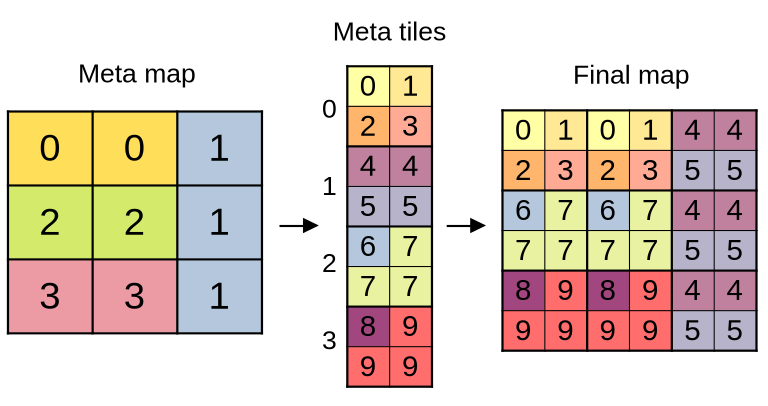
In practice, meta maps work like this:
- The developer decides the size of a meta tile. In this example the size is 2x2 tiles of 8x8 pixels (so the size of a meta tile is 16x16 pixels).
- The designer designs the meta tiles as 16x16 tiles. Then, the meta tiles are used to create the final meta map.
- When the developer wants to display the meta map in the console, the program needs to expand each 16x16 meta tile into the 8x8 tiles that form it to obtain the final result.
How does this save memory? Imagine you have a map with size 1024x1024 pixels. Each tile map entry is 16-bit wide (2 bytes). The size of the map will change depending on how many tiles are required to define it:
- 8x8 tiles. Map size is 128x128 tiles: 128 * 128 * 2 = 32 KiB
- 16x16 meta tiles. Meta map size is 64x64 meta tiles: 64 * 64 * 2 = 8 KiB
- 32x32 meta tiles. Meta map size is 32x32 meta tiles: 32 * 32 * 2 = 2 KiB
Big meta tiles can reduce the size of a map by a lot. Of course, this comparison doesn’t include the space required to store the meta tiles!
- 16x16 meta tiles. 2 * 2 * 2 = 8 B per meta tile
- 32x32 meta tiles. 4 * 4 * 2 = 32 B per meta tile
This means that you will only save space as long as there is enough repetition in your meta map. If you use the same meta tiles often you will be able to save a lot of memory. If you have lots of different meta tiles you will end up needing even more memory than with a regular 8x8 tile map (and you should just use a regular map without meta tiles!).
You can use grit to convert images into maps that use metatiles:
# 4 bpp, tiles, export map, SSB layout, set magenta as transparent, 2x2 meta tiles
-gt -gB4 -mR4 -mLs -gTFFOOFF -Mh2 -Mw2
The new options are -Mh2 -Mw2. They set the meta tile size to 2x2 tiles.
If you want to see how to load a map like this one, check the following example:
examples/graphics_2d/bg_regular_4bit_metamap.